Intro to Activity
The Blending Drill is a quick, low-preparation routine used to reinforce grapheme-phoneme (letter-sound) knowledge and blending skills. It is a component of the Orton-Gillingham approach and typically serves as a warm-up at the beginning of a systematic, explicit phonics lesson. The Blending Drill is a specific way of practicing the Simple Decoding Routine that prioritizes quick, repetitive practice with many short words to build accuracy and automaticity decoding single syllables.
Teachers use grapheme (letter) cards, typically the same ones used in the Visual Drill, to present a word for students to read. They then exchange one grapheme card to make a new word for students to read, and so on. The speed of this drill provides teachers with a fast, ongoing opportunity for informal observation of student progress with their phonics knowledge and blending skills. However, note that the speed of the drill and occasional inclusion of nonsense words deemphasize the critical decoding step of confirming that the read word is indeed a real, known word.
Students
Discover the types of students who may benefit from this activity.
Teachers display words containing taught grapheme-phoneme correspondences based on their phonics scope and sequence and student needs. Because of this flexibility, the Blending Drill is appropriate for readers across a wide range of reading abilities. This routine is especially beneficial for students in the Partial Alphabetic Phase (students recognize some letter-sound relationships) and students in the Full Alphabetic Phase (students have most major phoneme-grapheme correspondences in place).
Most students can blend phonemes of short, two- to three-sound words by 6 years old. Therefore, instruction and practice with the Blending Drill can typically begin in Kindergarten once students have mastered a few grapheme-phoneme correspondences and continue with older readers in the Full Alphabetic Phase, practicing more complex phonics patterns.
Getting Started
The steps outlined in the tabs below provide a clear and structured approach for teaching this activity to students.
Compile previously taught graphemes to create a review deck for the Blending Drill. The routine should be short. We recommend teachers limit this activity to fewer than three minutes. Therefore, you may not have time to review every previously taught grapheme each day. Practice newly learned correspondences more frequently, interspersing previously learned correspondences as a review.
Remind students that letters represent sounds in spoken words. Explain the purpose of the routine. If you plan to include nonsense words in this drill, establish that now. (See Take Note!, below for more guidance.)
Example:
"Today, we're going to use the letter sounds we've learned to sound out and read words."
Use the grapheme cards to create a decodable word. Model how to respond with a teacher-led demonstration using the Simple Decoding Routine. Change one grapheme card at a time to create additional words for students to decode.
Example for the word wag:
Step 1: Sound Out
- "Listen to the sounds /w/.../ă/.../g/."
- [Point under each grapheme as you say the phoneme.]
- "Now I'll say the sounds again without pausing. /w/.../ă/.../g/..."
- [Point under each grapheme as you repeat the phonemes.]
Step 2: Confirm
- "Wag!"
- [Point from left to right to blend and decode the word.]
Step 3: Continue quick, repetitive practice
- [Quickly change one grapheme, for example, show "wig," "pig, and "peg." Read the words without isolating the sounds.]
- "I'm all warmed up, let me keep reading. Wig! Pig! Peg!"
Continue to change one grapheme card at a time to present many short words, perhaps continuing to say the words with the students. Again, the goal is to build accuracy and automaticity with many repetitions. Have students chorally read the whole word and only stop to sound out the word when necessary.
Fade your voice as you continue to present new words. Monitor student responses for accuracy throughout the activity.
Immediately support students who make an error.
Example:
If a student reads past as pat, point to the missed <s> and prompt them to try again. If needed, model the word for the student, emphasizing the missed phoneme.
- "Watch and listen as I read: /p/.../ă/.../s/.../t/. Read with me: /p/.../ă/.../s/.../t/. What's the word?"
If the student cannot blend the word appropriately on the second attempt, provide the appropriate response.
Take Note!
Here are some special considerations when using this activity:
- Keep graphemes in allowable positions. Whether you present the Blending Drill digitally or with physical cards, graphemes should appear in positions that reflect conventional English spelling patterns. For example, <ck> should only be used in the final position of a short vowel syllable. Preview the cards before revealing the word to check for accuracy and to screen for inappropriate words.
- Determine if grapheme cards will include hyphens. Some grapheme cards use hyphens to show spelling generalizations (e.g., <st-> for /s/.../t/ or <-oy> for /oi/) and help teachers organize materials quickly. However, these symbols can confuse some students since they do not generally appear in words (e.g., stay, toy). If your cards have these symbols, cover the hyphen with neighboring grapheme cards to prevent confusing students.
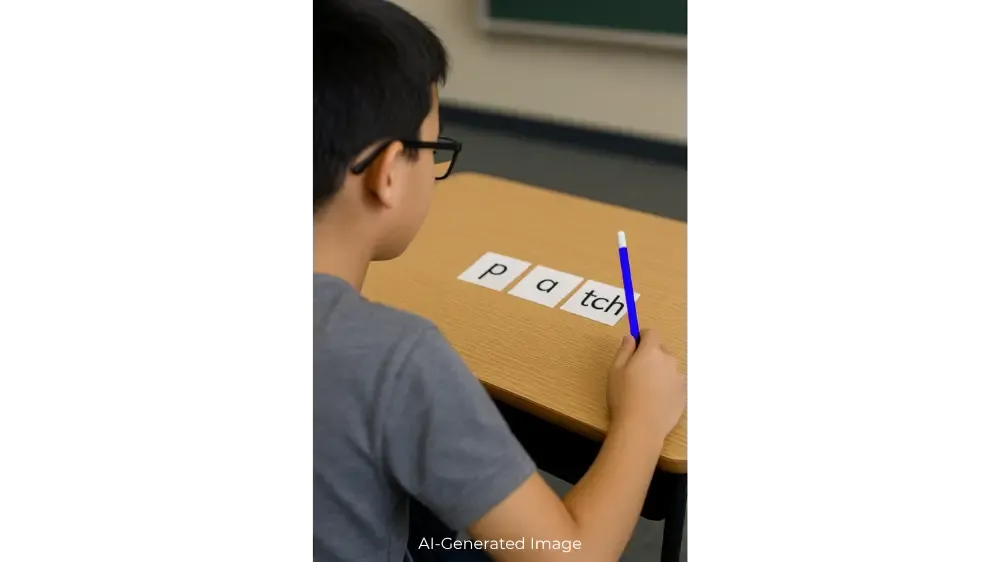
- If students make a mistake on a word with a blend, direct students to sound out each phoneme. To increase the activity speed and simplify material organization, some cards have multiple graphemes on them. For example, <st> is often printed on one card so that you don't need to manage building a blend with two cards (e.g., <s> and <t>). Students who make a mistake or who need to sound out the word should be directed to sound out each phoneme individually. For instance, if the word past is shown on three cards (e.g., <p>, <a>, <st>), students should point to the four graphemes in the word while saying /p/.../ă/.../s/.../t/.
- Use blends to vary word lengths. Some students overgeneralize the CVC (consonant-vowel-consonant) structure and attempt to make all words fit this pattern. As students become more skilled with blending, choose words with varying grapheme lengths. Keep in mind the more graphemes in a word, the more difficult it will be to decode.
- Include taught syllable types. As students progress, ensure that practice words represent a variety of syllable types. This helps students generalize their blending skills and apply what they’ve learned to more complex word structures. For example, you may show students a progression that includes the words no→ not → note once open, closed, and vowel-consonant-e syllables have been taught (whether or not students have been taught these syllable type labels).
- The Blending Drill should not be the primary way students read words. It deprioritizes the essential decoding step of confirming a word. In part, because it prioritizes many repetitions, often with nonsense words. While nonsense words provide a way to practice decoding, they do not build language comprehension and may not be the best choice for students with developmental language disorders, English Learners, or students with limited vocabulary knowledge. Some teachers add an optional task in which students simultaneously give a thumbs up or thumbs down while reading the word to indicate if it is real nonsense. Still, this drill should be used sparingly as a way to get quick, efficient practice and be paired with ample time for students to read real words using the Simple Decoding Routine in isolation and connected text.
- The teacher should intentionally change the graphemes. When exchanging cards, use your knowledge of student errors to decide which graphemes to change. For example, if students often confuse short vowels, you may choose to focus on changing the vowel grapheme. To ensure the instruction is targeted to align with students’ needs and appropriately paced, the teacher, not students, should present the words.
- Review skill overview. For additional considerations when targeting this skill, see the Decoding Overview.
Classroom Connection
See this activity in action through a teacher-led demonstration.
In this demonstration, a teacher uses the Blending Drill one-on-one. This teacher incorporates learned morphemes into the activity and adjusts the level of support based on the student’s needs. Since this student can read most words accurately and automatically, the teacher does not require her to sound out each individual phoneme (e.g., /s/.../k/.../r/) and need not do so unless the student were to make an error. Notice how the teacher maintains a brisk pace, offers immediate feedback, and ensures that each syllable or word is read accurately before moving on.
Differentiation
Learn how you can enhance instruction to meet the needs of diverse learners.
- Provide additional exposures for students consistently misreading a grapheme. If a student makes a mistake, don’t immediately rotate the card out. Keep it in use for a few additional words to provide more targeted exposure.
- The point of the Blending Drill is to read the words automatically. If a tricky word requires a student to sound it out, encourage them to do so silently in their head, rather than audibly, to support their transition to automaticity.
- For students who are ready, incorporate familiar prefixes and suffixes into the routine, as seen in the Classroom Connection (above) with the word chums.
- The Getting Started section, above, demonstrates sounding out a word using whole-word blending. Students who struggle to produce the word after blending may benefit from continuous or additive blending. See the Blending Techniques video below demonstration below. Note that continuous blending (also referred to as connected phonation) is easiest to implement with words that begin with continuant phonemes (the phoneme can be stretched and held), so these words may be prioritized when first teaching the routine.
- For additional differentiation when targeting this skill, see the Decoding Overview.
Coaching Corner
For occasional use: optional ideas to bring energy, engagement, or ease to the activity.
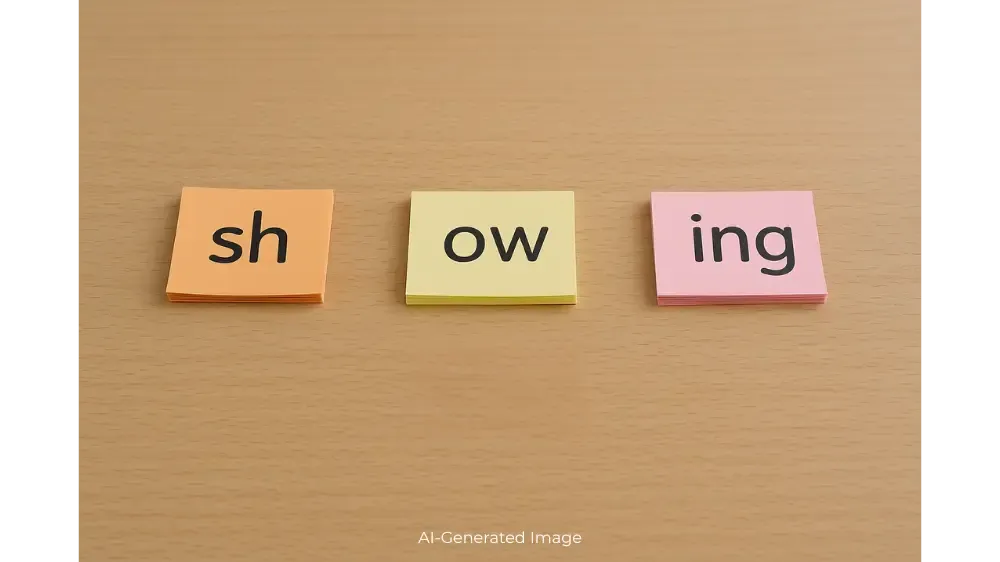
You can use color coding to help keep your materials organized. For example, print all your vowel cards yellow paper, all your cards that allowing in the first position orange, suffixes pink, etc.
Resource(s)
Explore the resource(s) to support your implementation of this activity.
Toolkit resources help you implement high-quality instruction. To guarantee student success, these tools must be used in tandem with direct, systematic, mastery-oriented instruction and a high-quality curriculum.